How to Make Organza Wings for Your Ooak Art Doll
In that location are a few supplies that you'll need to make fairy wings: Now that you take your tools assembled let'due south become! The first thing you need is a wing pattern.
I promised this tutorial ages ago and since I was making a pile of wings this week, I decided now was the fourth dimension. "Pile of wings"...hmm...is in that location a collective noun for a grouping of wings? Ack, I've been distracted by my inner word geek...back to the tutorial.
apparently white paper (re-create, notebook, whatsoever)
32 guess Florist'southward cloth covered wire ( the kind on a spool is best link )
pocket-size sharp pair of scissors
pencil
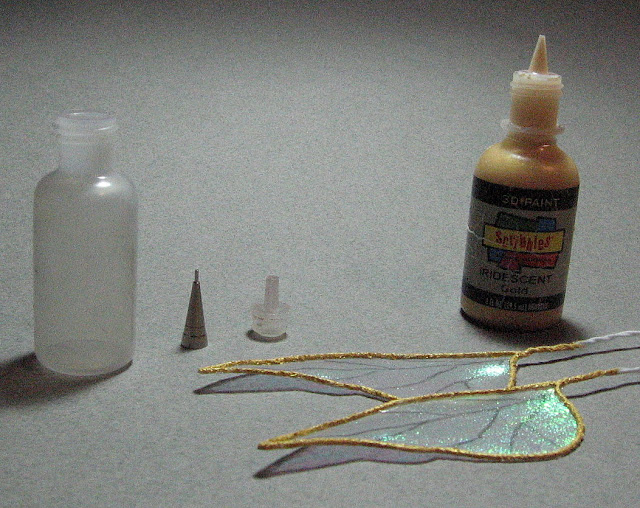
non-toxic craft glue (I use Aleene's Tacky glue)
textile paint (I dearest Lumiere!)
a sheer shimmery fabric
dimensional or puffy fabric paint
applicator bottle and metal tip ( This is very important for those fine lines. Bachelor here.)
an old towel
wax paper
Look at pictures of collywobbles and simply make one that works for you. Here'due south one of mine:  You'll demand to have veins fatigued on your wing and yous will need to accept a reverse copy. You can make this with your printer or just record the drawing to a sunny window and trace the pattern on the back side of the paper. (I like this; less wasteful of paper.)
 At present take your wire and shape it to the outer lines of your design. Twist the ends together at the base of the fly and leave a tail. Easy peasy! How long of a "tail" depends on what type of doll I'thousand making. For the small-scale dollhouse size pixies I demand well-nigh iii" then I can wrap it around the doll.
 At present paint the fly on both sides with the textile pigment and let it dry. I like to apply an egg carton with small holes punched in the lesser for my drying rack, it works great!


When the wings are dry, y'all'll need to cut a piece of the sheer material. Cutting it bigger than the wing on all sides. 
Here'due south where the former towel comes in. Use the mucilage to ONE side of the wing. Call back yous need a right and left wing so brand sure you lot take this into account when gluing. I do this on top of an onetime towel and and then gently absorb the mucilage so it is evenly distributed and not too thick. So lay the fly on the sheer fabric and gently printing together (I apply the towel for this as well.)


Now put your wing on a slice of wax paper. Once you lot've finished gluing all your wings, identify another slice of wax paper on superlative and then weight them all down with a heavy book or two...at final those high school twelvemonth books come up in handy! You'll need to let these dry for 4-6 hours and so open the wax paper and give them an additional 30 mins or so. The mucilage needs to be completely dry.
 Okay, now information technology's fourth dimension to cut away the excess cloth from the outside of the wing. Be patient and cut advisedly, right side by side to the wire. If the fabric is not sticking in any areas utilise a tiny flake of glue and press together with your fingers; let dry again then trim.
  The side by side footstep is to mark the veins on the wing, this is why y'all needed a opposite design. I do this in pencil, but information technology depends on the cloth, a dark silk may crave a white marking pen.
 At present for the tricky role. You tin utilize the tip that is already on the dimensional paint but I merely don't think that they take a fine enough line. I switch out the tip on the bottle for a one of these in a size 5. This makes a very fine line.
 Hold the wing slightly up and become advisedly here when applying your lines equally information technology's piece of cake to make a mistake. If you really mess upward you tin can blot the wing with a wet cloth, let information technology dry, and starting time over.
When you lot're done place the fly in a slightly bent position to dry. You don't desire the wing lying flat at any bespeak in this part of the procedure as the paint will soak through and spread.
 Once the wings are dry, which takes about an hour, you're set up to go!
I promise this is helpful, delight ask away in the comments section if you have any questions.

Source: https://www.thefairiesnest.com/2009/01/wing-tutorial-at-last.html
0 Response to "How to Make Organza Wings for Your Ooak Art Doll"
Post a Comment